Reconfiguring Norton Security Suite To Allow Client/Server Connections
Reconfiguring Norton Security Suite To Allow Client/Server Connections
Description of Issue:
A recent update to the version of Norton Security Suite that is provided by Comcast to its subscribers may reset all firewall settings and remove exceptions for Sesame.
This can result in network connecivity issues when running Sesame in a Client/Server environment.
Affected Users:
- Individuals using the Norton Security Suite utility provided by Comcast who use Sesame in a Client/Server environment.
Symptoms:
- Sesame Client connections are dropped and the Sesame Client closes within 1-5 minutes starting Sesame.
- Clients may recieve a message that states "Error Communicating With Server".
Quick Navigation:
Steps to reconfigure exceptions for the Sesame exectuable in Norton Security Suite
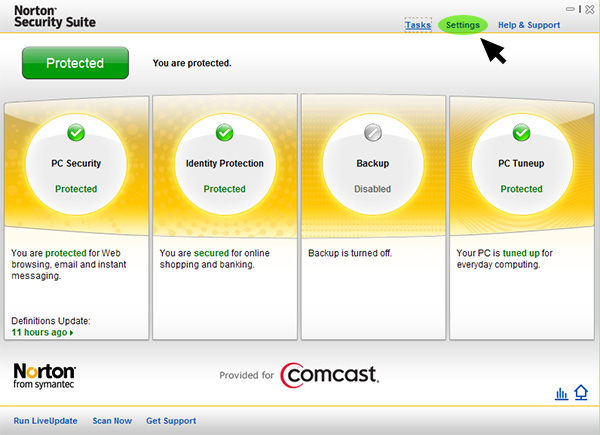
- Open the control panel for Norton Security Suite.
You can do this by double-clicking on the Norton icon in your Windows taskbar or via the Start Menu.
- Left click on the option for 'Settings' located in the top right corner of the Norton window.

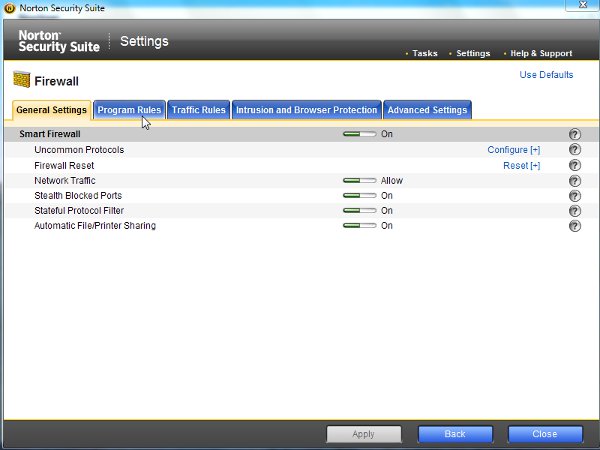
- In the Settings panel, left-click on the option labeled 'Firewall'

- In the Firewall panel, left-click on the tab labeled 'Program Rules'

- On the Program Rules tab, left-click on the command button labeled 'Add'

- A file dialogue box will open and prompt you to select a program
Navigate to 'C:/Sesame2/Program' (or your machine's Sesame directory) and select 'Sesame.exe'
- A Norton Security Suite message will appear and ask what you want to do with the executable file
Select 'Allow' and left-click the command button labeled 'OK'
- On the Program Rules tab, left-click on the command button labeled 'Add'

- A file dialogue box will open and prompt you to select a program
Navigate to 'C:/Sesame2/Program' (or your machine's Sesame directory) and select 'SDesigner.exe'
- A Norton Security Suite message will appear and ask what you want to do with the executable file
Select 'Allow'
- On the Program Rules tab, left-click on the command button labeled 'Apply' at the bottom of the window

Steps to reconfigure port exceptions in Norton Security Suite
- Open the control panel for Norton Security Suite.
You can do this by double-clicking on the Norton icon in your Windows taskbar or via the Start Menu.
- Left click on the option for 'Settings' located in the top right corner of the Norton window.

- In the Settings panel, left-click on the option labeled 'Firewall'

- In the Firewall panel, left-click on the tab labeled 'Traffic Rules'

- On the Traffic Rules tab, left-click on the command button at the bottom of the window labeled 'Add'
This will take you to the 'Add Rule' wizard.
- In the 'Add Rule' wizard, select the option labeled 'Allow: Allow connections that match this rule'
Left-click on the command button labeled 'Next' at the bottom of the window
- In the 'Add Rule' wizard you will be asked, "What type of connection do you want to allow?"
Select the option labeled 'Connections to and from other computers'
Left-click on the command button labeled 'Next' at the bottom of the window
- In the 'Add Rule' wizard you will be asked, "What computer or sites do you want to allow access to?"
Select the option labeled 'Any computer'
Left-click on the command button labeled 'Next' at the bottom of the window
- In the 'Add Rule' wizard you will be prompted for the type of protocol to allow, leave the combo box set to 'TCP and UDP'
You will also be asked, "What types of communication or ports do you want to allow?", select the option labeled 'Only communications that match all types and ports listed below'
Left-click on the command button labeled 'Add' at the bottom of the window
- In the 'Specify Ports' window, make the following settings:
- Set "Filter By:" to 'Port Range'
- Set "Locality:" to 'Local'
- Set "Enter the starting point" to '20000' (or to the first port of the two you use)
- Set "Enter the ending point" to '20001' (or to the second port of the two you use)
Left-click on the command button labeled 'OK' at the bottom of the window
- In the 'Add Rule' wizard, Left-click on the command button labeled 'Add' at the bottom of the window

- In the 'Specify Ports' window, make the following settings:
- Set "Filter By:" to 'Port Range'
- Set "Locality:" to 'Remote'
- Set "Enter the starting point" to '20000' (or to the first port of the two you use)
- Set "Enter the ending point" to '20001' (or to the second port of the two you use)
Left-click on the command button labeled 'OK' at the bottom of the window
- In the 'Add Rule' wizard, Left-click on the command button labeled 'Next' at the bottom of the window
- In the 'Add Rule' wizard, you can leave both options unchecked
Left-click on the command button labeled 'Next' at the bottom of the window
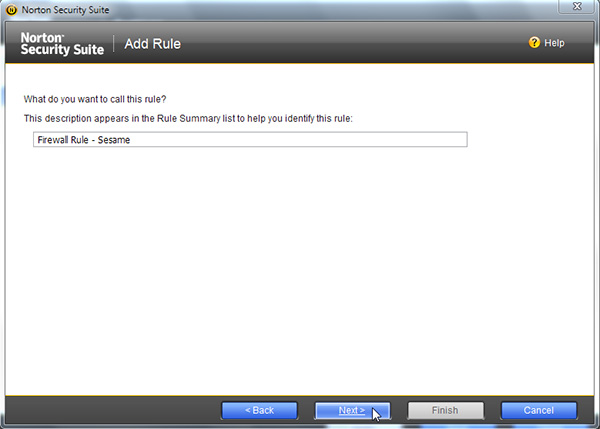
- In the 'Add Rule' wizard, you can name the rule you have just created
We recommend a name like "Firewall Rule - Sesame Ports
Left-click on the command button labeled 'Next' at the bottom of the window
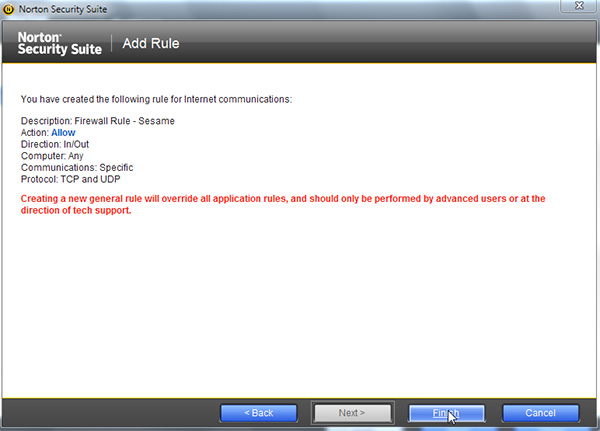
- You can left-click on the command button labeled 'Finish' to complete the wizard

- Exit the Norton Security Suite control panel and reboot your machine
Related Knowledgebase Articles:


